
How to Create LinkedIn Ads | A Walkthrough to Launching Your First LinkedIn Ads Campaign


If you’ve never advertised on LinkedIn before, getting started can be a bit overwhelming. But from creating a LinkedIn Ads account to launching your first ever campaign, we’ve put together this full walkthrough, loaded with step-by-step instructions and best practices, to help get you moving in the right direction.
Let’s get started! 🍎📏
LINKEDIN ADS ACCOUNT HIERARCHY
The LinkedIn Ads account hierarchy is very similar to other digital ad platforms.
At the top of the hierarchy, you have your LinkedIn Ads account. Your account is associated with your LinkedIn company page and specifies which currency you will be charged under.
Within every LinkedIn Ads account, you can have one or more campaign groups. At this level, you can control whether to pause or activate your campaign groups (and subsequently all campaigns and ads within that campaign group) and set them up to run continuously from a start date, end on a specific date, or end on a specific date while staying within a budget limit.
Within every campaign group, you can have one or more campaigns. At the campaign level, you can set up audience targeting, select an ad format (such as Single Image Ads, Video Ads, or Text Ads), set a budget and bidding strategy, and more.
Within every campaign, you can have one or more ads. At this level, you can create ads from scratch or boost (or sponsor) existing content from your company page.
CREATE A COMPANY PAGE (RECOMMENDED)
Before you can start running ads, you need to create a LinkedIn company page. Note that not all LinkedIn ad formats require a company page, but the most simple and effective ones do, so it’s worth taking the time to set up. Also, it’s a good way to build trust with your audience, if they decide to research your company on LinkedIn after seeing an ad from you.
Click here to create a LinkedIn company page.
ACCESS LINKEDIN CAMPAIGN MANAGER
Once your company page is created, click here to access LinkedIn Campaign Manager.
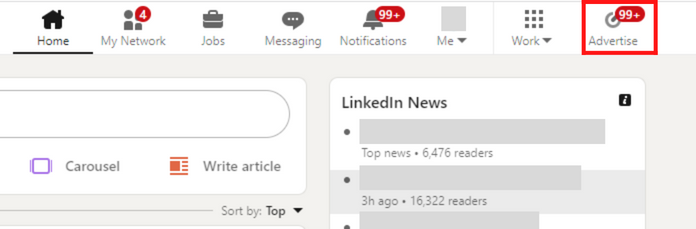
You can also access Campaign Manager by logging into your personal LinkedIn account and clicking “Advertise” in the top right corner of the navigation bar.
STEP 1: CREATE A LINKEDIN ADS ACCOUNT
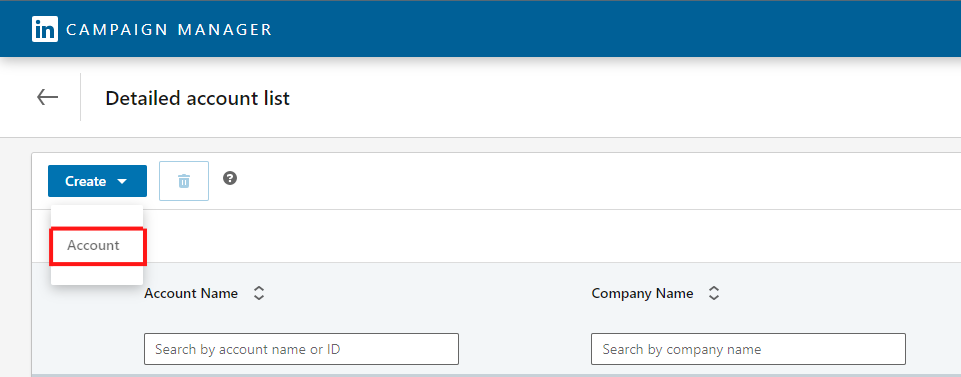
Once you’ve logged into Campaign Manager, you can begin creating your LinkedIn Ads account.
Start by clicking the “Create” dropdown near the top left corner. Then click “Account”.
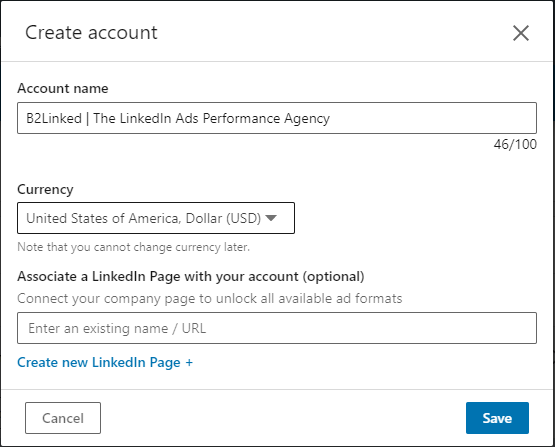
A popup will then appear, which will allow you to name your account, select a currency by which you want to be charged, and connect your LinkedIn company page that you just created.
Note that, once you select a currency and connect your LinkedIn company page, this cannot be edited later.
STEP 2: CREATE CAMPAIGN GROUPS (OPTIONAL)
With your LinkedIn Ads account created, you’re ready to create a campaign group.
The reason this step is optional, though, is because LinkedIn will automatically create a Default Campaign Group with the creation of your new account. But this campaign group can never be paused or edited and is set to run continuously from the time your account is created.
So, if you want a little more control over your campaign group(s), we recommend creating your own.
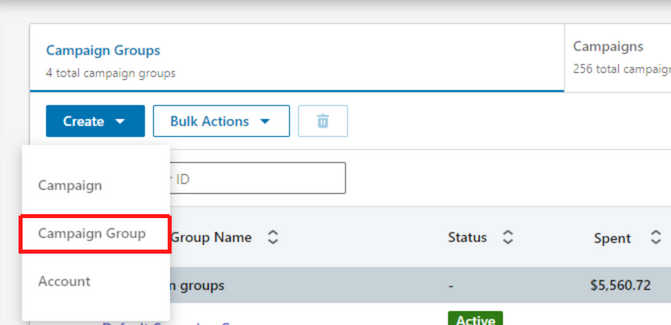
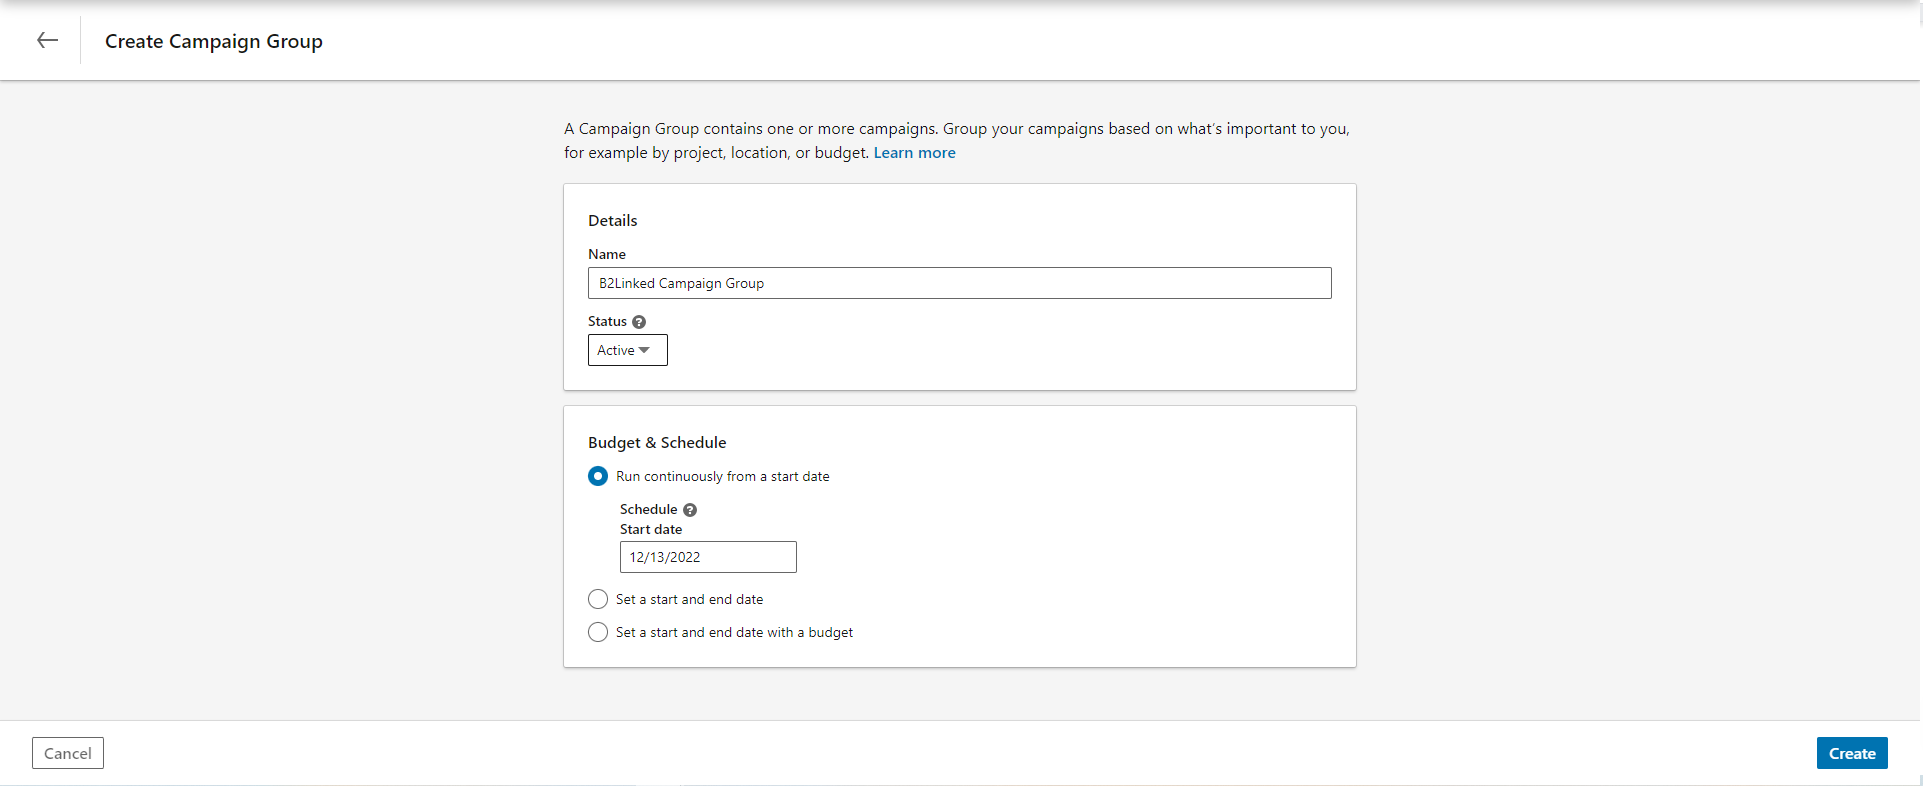
To do that, click the “Create” dropdown near the top left corner again and select “Campaign Group”.
Next, fill out the details of your campaign group, such as its name, status (Active or Draft), and budget and schedule. Then, click “Create”.
STEP 3: CREATE CAMPAIGNS
Here’s where things get really exciting.
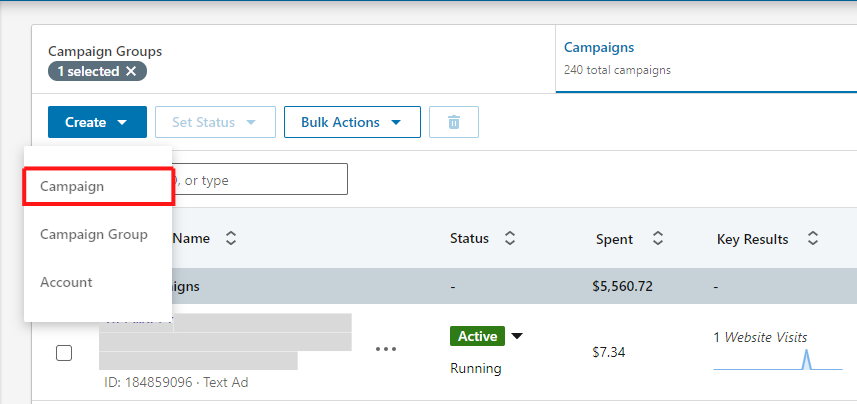
Click into your newly created campaign group to begin creating campaigns. Like before, click the “Create” dropdown again and select “Campaign” to create your first campaign.
Before creating the campaign, LinkedIn will have you select which campaign group you want this new campaign to be created in. The campaign group that you clicked into prior to creating the campaign will be selected by default, but if you want to change that, simply click “Use a different group” to the right just above the campaign group name. Then click “Next”.
OBJECTIVE SELECTION
The first step to creating a campaign is selecting your objective. There are 7 objectives to choose from (8, if you have access to LinkedIn Recruiter). Select the objective that best aligns with your goals.
For more on campaign objectives, check out this episode of The LinkedIn Ads Show.

AUDIENCE
Next, define your target audience. You can target criteria such as geography, job title, skills, level of seniority, years of experience, company name, industry, and much more.
There’s a lot to cover in just LinkedIn’s targeting capabilities alone. If you’re looking for more resources on how to best reach your ideal customer persona using LinkedIn Ads, see this post.
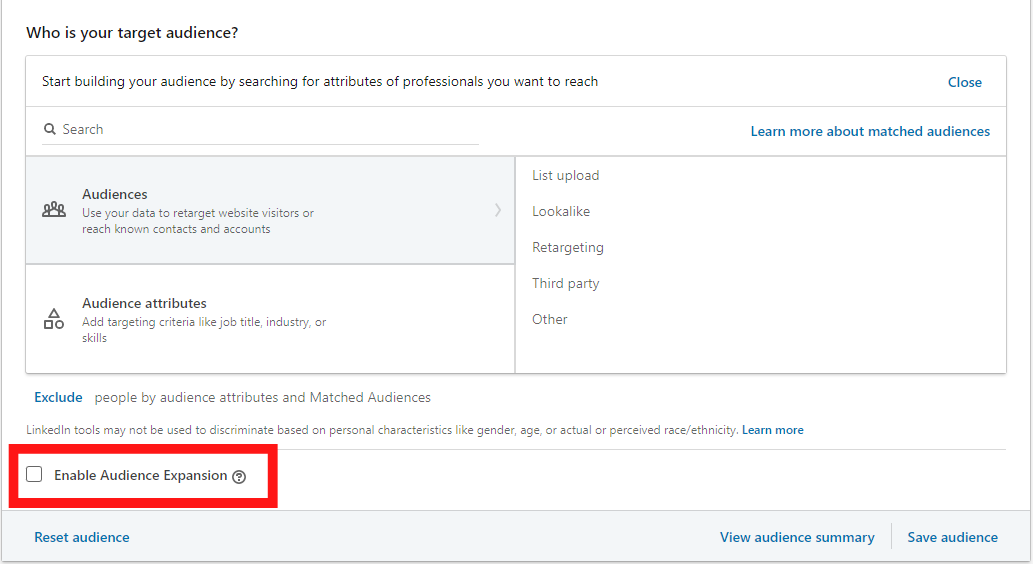
Here’s a tip: be sure to uncheck the checkbox that says “Enable Audience Expansion” at the bottom of the Audience section. What this feature does is extends your reach to those who are outside the criteria you’ve defined up until this point. So if you want to avoid muddying your targeting, best to leave this box unchecked.
AD FORMAT
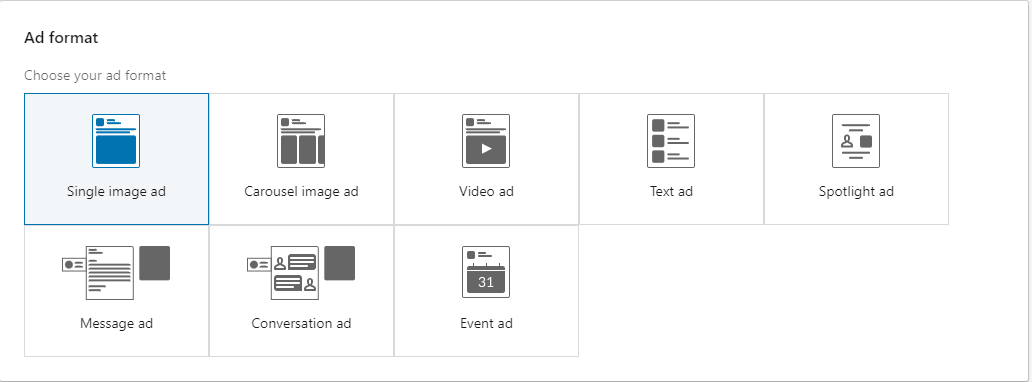
After defining your audience targeting, you can move on to select your ad format. The list of ad formats may differ slightly depending on which campaign objective you chose (Document Ads are only available under the Brand Awareness and Lead Generation objectives, for example), but they should be relatively similar, for the most part.
The most simple ad format, and one we recommend for those just starting out on the platform, are Single Image Ads, but similar to selecting campaign objectives, select the ad format that best aligns with your goals and assets on hand.
PLACEMENT
Next is the Placement section. Here, you can select to either run your ads on the LinkedIn platform or both LinkedIn and the LinkedIn Audience Network (LAN).
Similar to Google’s Display Network, LAN is a list of trusted third-party sites that LinkedIn will display your ads on. Based on our experience, running ads on LAN can result in extremely high clickthrough rates and low costs per click, but the quality of web traffic can be poor.
For this reason, we may not recommend leveraging LAN if you’re just starting on LinkedIn Ads.
BUDGET & SCHEDULE
Next is setting up your budget and bid.
At the budget level, you have the option of setting a daily or lifetime budget, or both. If you set a lifetime budget, your campaigns will stop running once you’ve spent your specified amount. You can also set campaigns to run until a specific date.
We recommend setting a daily budget and letting campaigns run continuously for the greatest amount of control. This allows you the flexibility to spend the way you want from day to day (Having a high performance day? Increase spend. Having a low performance day? Decrease spend) without constrictions. Just be sure to keep an eye on how much you’re spending from day to day to ensure you don’t underspend or overspend your allotted LinkedIn advertising budget.
At the bidding level, you have options for setting both an optimization goal and bidding strategy. Similar to ad formats, your optimization goal options may be different depending on which campaign objective you chose, but they should be similar, for the most part.
When it comes to bidding strategy options, you can select between either Maximum delivery, Cost cap, or Manual bidding (if you click the “Show additional options” dropdown).
Out of the three, we recommend starting with Manual bidding in order to retain the most control over how much you spend. If you do select this option, be sure to also uncheck the box that says “Enable bid adjustment for high-value clicks”, as this can result in paying more for the same volume of clicks that you could be getting otherwise.
We also recommend bidding lower than LinkedIn’s suggested range here. You can often generate traffic and spend your full daily budget without bidding so high.

Like audience building, there’s a lot to be said for bidding and budgeting. Check out this episode of The LinkedIn Ads Show as a resource for bidding and budgeting strategy.
CONVERSION TRACKING
Lastly, you’ll want to track conversions that are taking place off-platform (such as booked calls, eBook downloads, etc.) and that can be attributed to your LinkedIn Ads efforts.
Setting up conversion tracking and creating conversions in your LinkedIn Ads account is a separate process that we aren’t going to explore in detail in this post, but you can find a full walkthrough of how to set up conversion tracking here.
Once you have conversions created, you can associate them with your new campaign(s) in the Conversion Tracking section, while creating or editing your campaign(s).
STEP 4: CREATE ADS
Once you’ve finished creating your campaign, you can either click “Save and exit”, if you want to come back later, or “Next” to begin creating ads.
As mentioned previously, you have two options when creating ads: You can either create from scratch or you can boost (i.e. promote) an existing piece of content on your LinkedIn company page. For the latter, simply click the “Browse existing content” button.
For the former, click “Create new ad(s)”. You’ll then be taken to a window where you can create your ad. You’ll have different options here depending on the ad format you selected in the campaign-making process but, in general, you can give your ad a name, write ad copy, attach media (such as static imagery or video), and select a call-to-action button.
Once finished, click “Save ad” in the bottom right corner to add your new ad to your new campaign.
After creating all ads you wish to run in your campaign, click either “Save and exit”, if you want to come back later, or “Next” to move on to the final step: Review & Launch.
STEP 5: REVIEW & LAUNCH
This final step will allow you to look through all you just set up in one singular view. If all looks good, scroll down to the bottom and click “Launch Campaign”.
YOU DID IT! 🎉
And that’s all there is to it! Give yourself a pat on the back for a job well done.
We know this was a lot to unpack. Is there anything we missed or any questions you have? Don’t hesitate to leave a comment below!
And if you want to jump into the channel but don’t have the time or expertise to do it yourself, consider booking a discovery call with us.
We’ll build, execute, and manage a holistic, custom-tailored LinkedIn Ads strategy for you to help you get more sales opportunities with your ideal prospects.
Written by Eric Jones

Copyright © 2014 - 2026 B2Linked.com. All Rights Reserved.