
LinkedIn Ads Conversion Tracking (Post iOS 14)


Conversion tracking is one of the most important aspects of marketing on any platform, as number of conversions, conversion rate, and cost per conversion are yet three more metrics you can leverage to tell whether or not your ads are performing well and can help you know where you need to optimize.
As you would expect with a subject like conversion tracking, there is a lot to cover, with multiple steps to set up and ways to track. Let’s dive into the different types of conversion tracking LinkedIn offers and how to set it up properly.
THE INSIGHT TAG
The first step to setting up conversion tracking is installing the LinkedIn Insight Tag on all pages of your website. The Insight Tag is a piece of JavaScript code that fires from your website to LinkedIn, and tells LinkedIn when a conversion has taken place off of the platform. Conversion tracking will not work without the Insight Tag installed.
Note that the Insight Tag will be unique for each ad account you manage (if you’re managing more than one). To find the Insight Tag for your ad account, go to Analyze → Conversion Tracking → Manage Insight Tag → See Tag → I will install the tag myself.
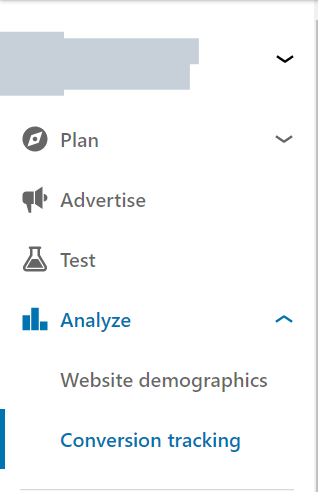
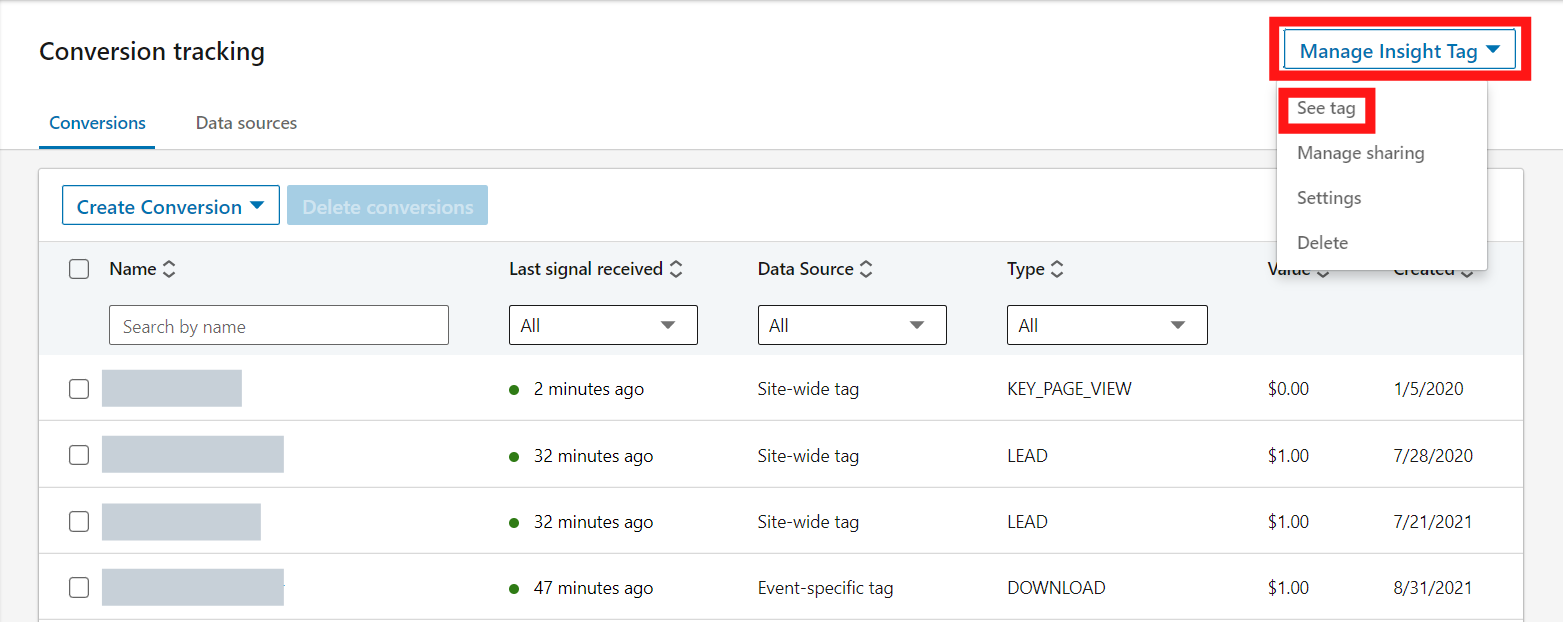

We recommend installing the Insight Tag on all pages of the website, if possible, as this removes any headache later if new webpages are created or you decide to track using different webpages.
But at the very least, the tag should be installed on the landing page right before the closing head tag (</head>). The reason for this is because, if it is any lower on the page, there is a possibility of it not fully loading before someone exits the page, resulting in some tracking falling through the cracks.
There are other methods for manually installing the Insight Tag, such as through Google Tag Manager. For instructions on how to do that, click here.
TRACKING TYPES
There are three types of conversion tracking on LinkedIn: page load, event-specific snippet, and event-specific image-based pixel. As a reminder, all of these need the Insight Tag installed to work properly.
Page load tracking is done by using the Insight Tag installed on both the landing page and thank-you page of the conversion event you want to track. Tracking with the event-specific snippet is done by installing a code on a link or button, in order to track a specific action that a user takes.
The event-specific pixel is similar to the new event-specific snippet. The biggest difference is that the image pixel only tracks third-party cookies, rather than both first- and third-party, like the event-specific snippet does. Due to recent privacy updates (like iOS 14), the event-specific image pixel may not be as accurate as the event-specific snippet.

SETTING UP TRACKING
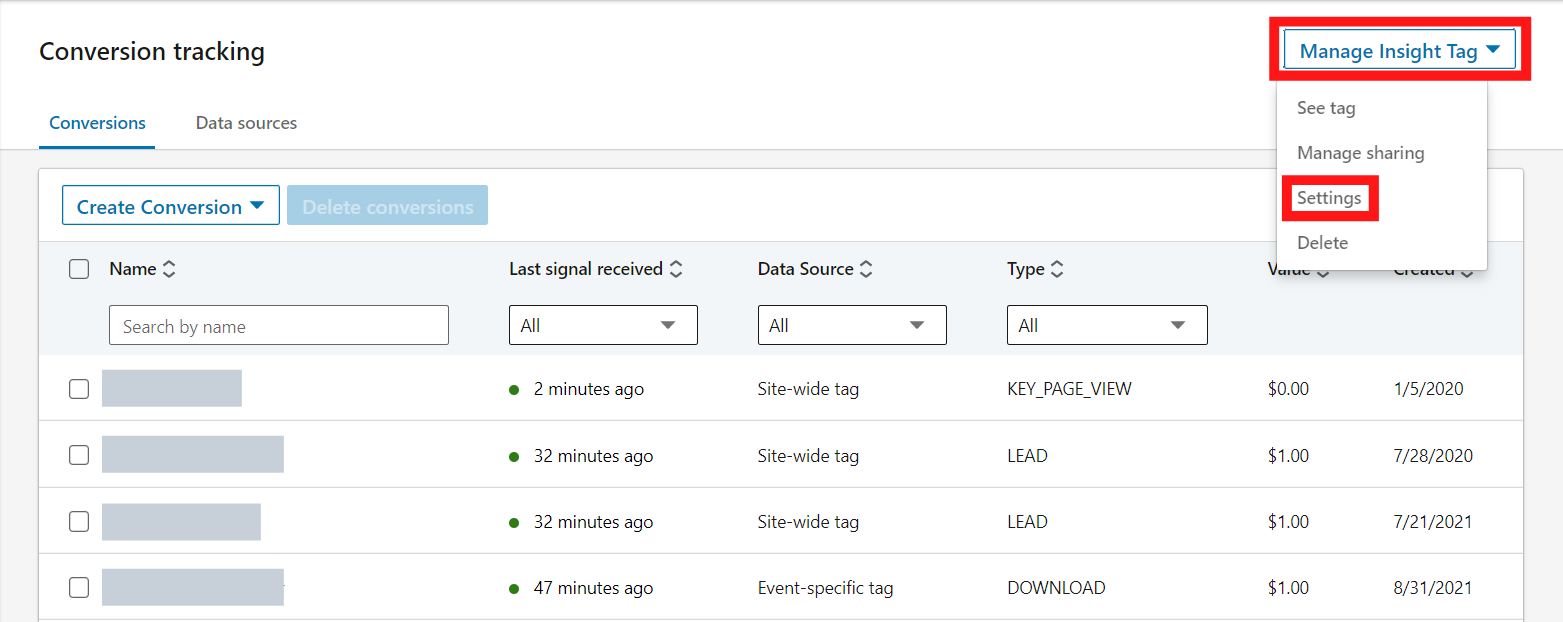
Once the Insight Tag is installed on your website, you will also need to enable “enhanced conversion tracking” to be able to track first party cookies. To do this, go to Analyze → Conversion Tracking → Manage Insight Tag → Settings → Click the checkbox under “Enable enhanced conversion tracking” → Save.


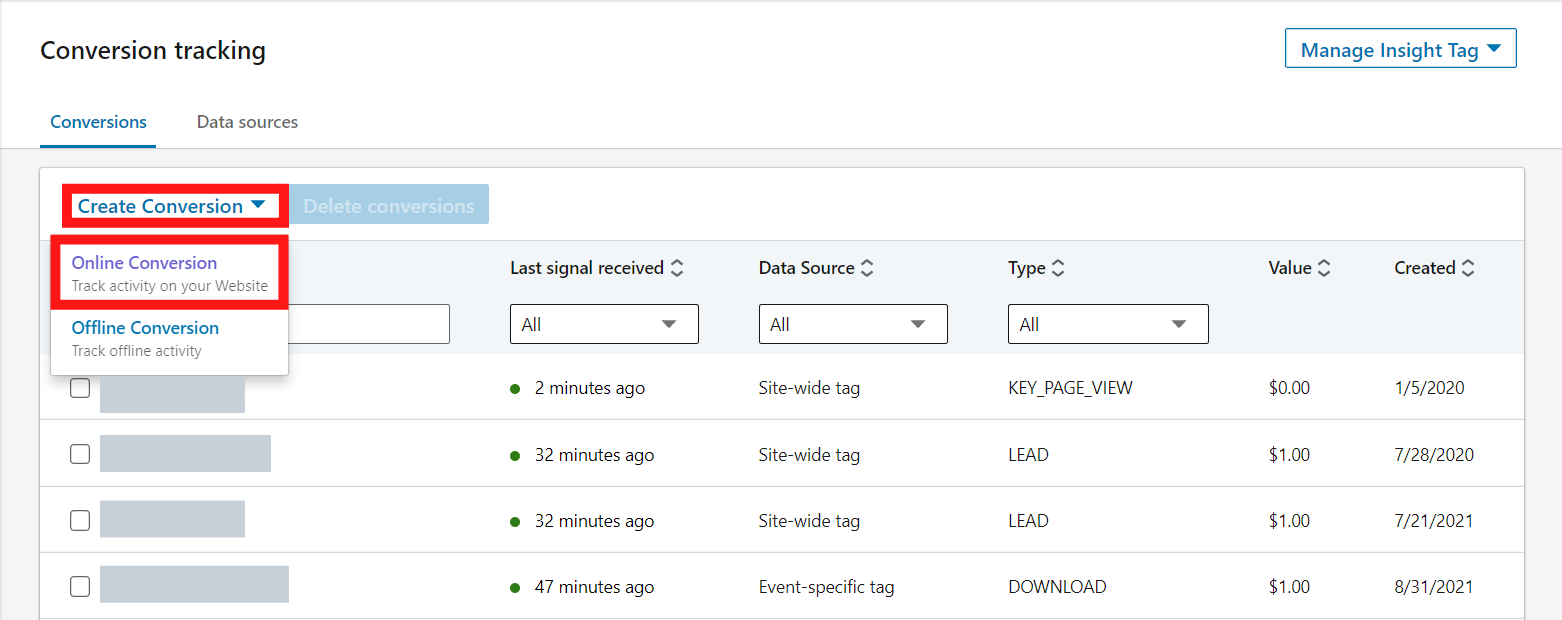
The initial steps to setting up conversion tracking are the same for all three types. You will go to Analyze → Conversion Tracking → Create Conversion → Online Conversion. From here, you’ll be able to set up the parameters of your conversion.

In the first step (Settings), you’ll name your conversion, select which conversion behavior best matches the conversion you want to track, and set how much a conversion is worth to you. You’ll also define a timeframe for when conversions can be counted and select an attribution model. We recommend leaving Clicks and Views at the default (30 Day Clicks and 7 Day Views) and using “Last Touch – Last Campaign” as your attribution model.
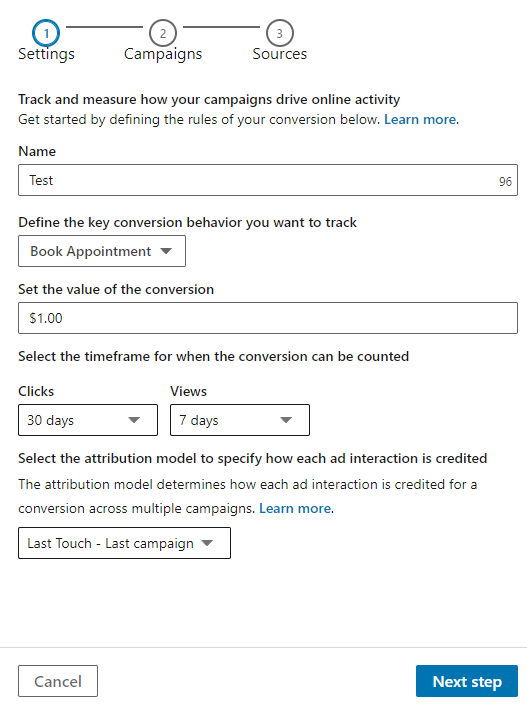
The former represents the timeframe for when LinkedIn will count a conversion. For example, if your window is set to 30 Day Clicks, and a user clicks on your ad and then converts 10 days later, then LinkedIn will count the conversion. If a user clicks on your ad and then converts 40 days later, LinkedIn will not count the conversion.
The same is true for the Views setting. Views represent View-Through Conversions. So if a user sees your ad, doesn’t click, and converts off of the LinkedIn platform within the specified timeframe, LinkedIn will count it as a View conversion.
The latter represents your attribution model. By selecting “Last Touch – Each Campaign”, LinkedIn will attribute a conversion to every campaign that led to one single conversion. To keep reporting clean, “Last Touch – Last Campaign” will only attribute one conversion to the last campaign a user was exposed to before converting.
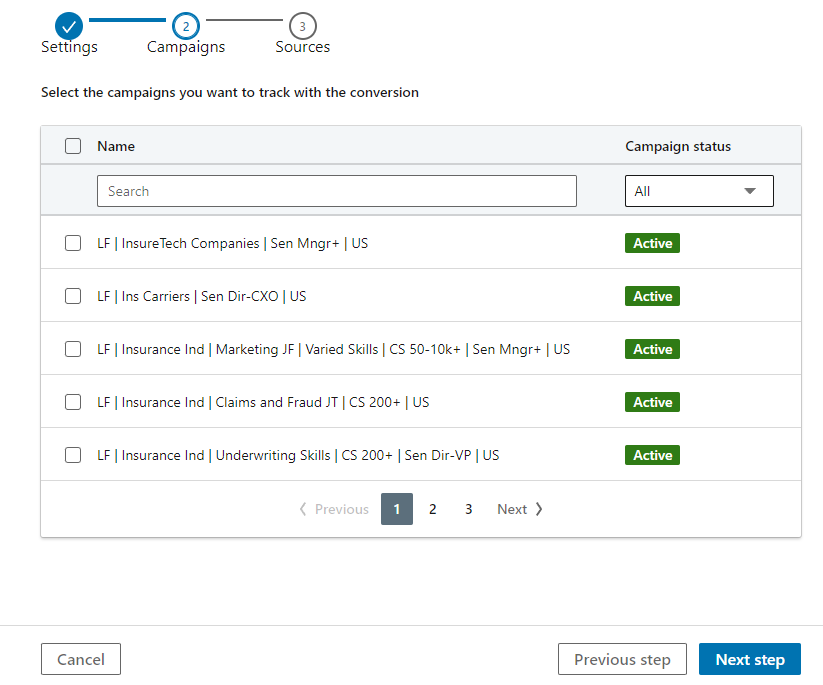
In the second step (Campaigns), you will select all campaigns where you wish to track your conversion. As a tip, it’s not necessarily a bad idea to select more campaigns than is initially needful here. If you ever decide to use those campaigns to track a specific conversion in the future, they’ll already be connected.
The third step (Sources) is where things will differ based on conversion type.
Page load tracking is the default type of conversion.
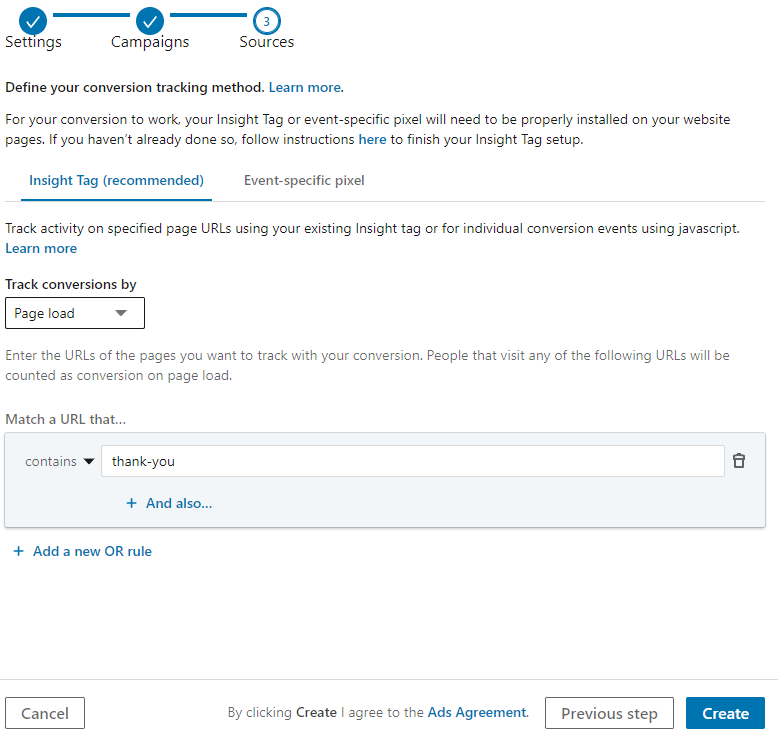
In the field that asks for the URL, we recommend using the “contains” parameter and the part of the URL that differentiates it from any other page on your site to show that it is the thank-you page. When that thank-you page is loaded, the conversion will be counted in LinkedIn.
For tracking using the event-specific snippet, the only difference is changing from “Page Load” to “Event” from the dropdown menu. You then add the code that is shown onto the relevant link or button on the page where you want to track conversions. Once that button or link is clicked, the conversion is recorded in LinkedIn.
Please be aware that the event-specific snippet is the most complex option when it comes to setting up conversions. You’ll most likely need the help of your Web Developer, if you decide to go with this option. For a detailed walkthrough of how to set this up using Google Tag Manager, check out this video.

To use the event-specific pixel, you will select that option when creating your conversion and add the code that is displayed onto a button or link.

BEST PRACTICES
So now that you have an idea of LinkedIn’s conversion tracking options and how to set them up, you are probably wondering what is the best choice for you. With all the changes to privacy restrictions on iOS, Google Chrome, and other browsers and operating systems, you might not have too much of a choice for long.
LinkedIn recommends using the Insight Tag either for Page Load or Event Tracking. The event-specific image pixel may not be too accurate anymore since it only tracks third-party cookies and not first-party. If we were to rank LinkedIn’s conversion tracking options from best to worst, they would be:
- Page Load
- Event-Specific Snippet
- Event-Specific Pixel
CONCLUSION
Undoubtedly, conversion tracking will continue to evolve and change as operating systems and browsers update their privacy and tracking policies. Though it will continue to change, taking the steps in this post will help you be at the forefront of tracking and make sure you aren’t missing any data to be able to make informed optimizations.
Anything here that we missed? What have been your conversion tracking strategies since these updates started happening? Leave a comment below!
And if you ever need help generating qualified leads at the lowest possible cost, reach out to our team of LinkedIn Ad experts here.
Written by Tucker Evans
